More Farm Machinery
Modelled in 3D
There is something oddly satisfying about modelling heavy equipment, and this one was no exception. Inspired by the CaseIH Magnum tractor.

I am Adam Keys, owner of Connex Keysolutions Inc., developer, designer & farmer. The following is a collection of my experiments. Feel free to get in touch.
Modelled in 3D
There is something oddly satisfying about modelling heavy equipment, and this one was no exception. Inspired by the CaseIH Magnum tractor.

And I came back with a List
To get a better feel for the generator pattern employed in Swift, I created a simple linked-list. Passing a List instance to a for ... in loop will iterate through the appended values.
class Node<T> {
    var value: T
    var next: Node<T>!

    init(_ value: T) {
        self.value = value
    }
}

public class List<T> {
    var head: Node<T>!
    var tail: Node<T>!

    public var isEmpty: Bool {
        return head == nil
    }

    public func append(value: T) {
        var node = Node<T>(value)

        if isEmpty {
            head = node
        } else {
            tail.next = node
        }

        tail = node
    }
}

extension List : SequenceType {
    public func generate() -> GeneratorOf<T> {
        var current = head

        return GeneratorOf {
            if current == nil {
                return nil
            }

            let value = current.value
            current = current.next

            return value
        }
    }
}
Below is a simple example of how to iterate through the list using the generator.
var list = List<Int>()

for i in 0...10 {
    list.append(i)
}

for i in list {
    println(i)
}
Assembly Instructions

This drawing was created to be used as part of the laptop/tablet stand's assembly instructions.
Turning a radio archive into an RSS feed
I found myself listening to a number of CHRW Radio programs via their program archives feature found on the website, but the 30 minute segments and no way to track progress proved to be a less than ideal user experience. Wanting to give Go a, ahem, go, I set out to improve on the listening experience. PlayAgain downloads a list of segments for each program episode, combines them, and generates an RSS feed entry which can then be picked up by any Podcast-supporting application. I use iTunes myself.
package progress

import (
	"fmt"
)

const barWidth = 60

type ProgressBar struct {
	Label    string
	Complete float64
}

func (p *ProgressBar) At(value int64, limit int64) {
	p.Complete = float64(value) / float64(limit)
	p.draw()
}

func (p *ProgressBar) Done() {
	fmt.Println()
}

func NewProgressBar(label string) *ProgressBar {
	return &ProgressBar{Label: label}
}

func (p *ProgressBar) draw() {
	fmt.Printf("\r%-15s[", p.Label)

	for i := 0; i < barWidth; i++ {
		if float64(i)/float64(barWidth) > p.Complete {
			fmt.Print(" ")
		} else {
			fmt.Print("#")
		}
	}

	fmt.Printf("] %3.0f%%", p.Complete*100.0)
}
PlayAgain is implemented as a simple command-line utility. As the MP3 files can be rather large in side, the code above displays the download progress to provide feedback to the user. Progress is displayed as a textulized progress bar [#### ] 20%.
Check it out the entire application on GitHub. Thanks to CHRW and those involved for creating the programs I have enjoyed.
A realistic looking scene done in Blender

Another stab at rendering

First attempt at rendering using Cylces

A work in progress
#pragma mark - Audio Interface

void audio_init()
{
	/* Enable ADC on pin PB4, left adjust mode */
	ADCSRA |= _BV(ADEN);
	ADCSRA &= ~_BV(ADSC);
	ADMUX |= _BV(ADLAR) | _BV(MUX1);
}

void audio_wait_for_input()
{
	uint8_t value;

	do {
		value = read_adc();
	} while (AUDIO_IS_SILENT(value));
}

void audio_wait_for_silence()
{
	uint8_t value;

	init_timer();

	while (timer_overflows < SHUTDOWN_DELAY) {
		value = read_adc();

		if (!AUDIO_IS_SILENT(value)) {
			timer_overflows = 0;
		}
	}

	cleanup_timer();
}
As a follow up form yesterday's Circuits post, a short expert from the codebase, designed to run on an ATtiny microcontroller.
Playing with a PCB design

Experimenting with visual design for an iPhone app

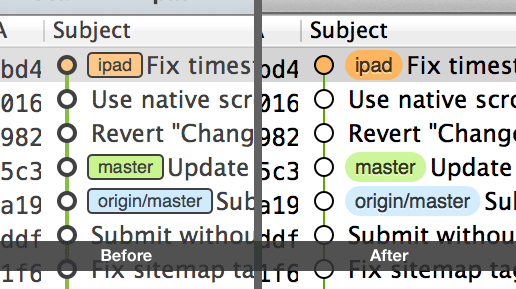
An attempt to make GitX look more Mac-like

And our website tells a little story

Using Arduino to control iTunes
Over the weekend, I threw together a little project to control iTunes with any IR remote control using an IR receiver and an Arduino to provide connectivity to the computer.

To begin, Ken Shirriff provided a handy little library to assist in the capture of the IR remote signals named IRremote. With that, the basic Arduino program ends up being just a few lines of code.
#include <IRremote.h>

#define IRRECV_PIN 11

IRrecv irrecv(IRRECV_PIN);
decode_results results;

void setup()
{
    Serial.begin(9600);
    irrecv.enableIRIn();
}

void loop()
{
    if (irrecv.decode(&results)) {
        // We will do something with the results
        // structure later.

        irrecv.resume();
    }
}
Since we defined the IRRECV_PIN in the code as pin 11, the output pin from the IR receiver should be connected to it. This partuclar IR receiver spec sheet calls for a resistor between Vcc and the Vin pin and a capacitor between Vin and Gnd, but if using a different device you should check the specs for it. The full schematic is provided below.

The next step is to do something with the results returned by the IRremote library. Ken also provides a handy method to create a FNV hash from the results. You can look at his example project. Using the results of his decodeHash method, we send the value over the USB connection to the computer with the Serial.println Arduino function.
void loop()
{
    if (irrecv.decode(&results)) {
        Serial.println(decodeHash(&results), HEX);
        irrecv.resume();
    }
}
On the Mac side, I turned to Ruby and the ScriptingBridge to watch the USB serial connection for remote codes and signal the results to iTunes. The Serial#gets will return a value each time the Arduino receives a code.
require 'serialport'
require 'osx/cocoa'
OSX.require_framework 'ScriptingBridge'

serial = SerialPort.new('/dev/tty.usbmodem621', 9600)
itunes = OSX::SBApplication.applicationWithBundleIdentifier('com.apple.iTunes')

while input = serial.gets.strip
    case input
    # E1DE04A2 was the hash given for the play/pause button on my remote.
    # Different remote vendors will use different codes.
    when 'E1DE04A2'
        itunes.playpause
    end
end
The actual Ruby program used to control iTunes is more involved, but I have decided to leave that for another post.
Parts list:
When you do not have the source code
After a complete system lockup, my computer booted back up to reveal that hours logged in TrackRecord for the day were nowhere to be found. Solution? Fix it, of course! Resolving these kinds of bugs usually require the source code to the application. Unfortunately, I do not have access to the TrackRecord codebase, but the fantastic SIMBL library streamlines injecting your own code into an existing binary.
The first step was to determine what methods were exposed in the application. Running class-dump on the binary revealed some interesting methods. Most importantly, a saveAction: method in the AppDelegate class. I whipped up a quick SIMBL extension class that would confirm that saveAction would, in fact, save the data.
@implementation TRPeriodicSave

- (void)startTimer
{
	[NSTimer scheduledTimerWithTimeInterval:10.0 target:self
		selector:@selector(performSave:) userInfo:nil repeats:YES];
}

- (void)performSave:(NSTimer *)aTimer
{
    [[[NSApplication sharedApplication] delegate] saveAction:self];
}

@end
Success! The injected code worked like a charm. I could have stopped there, but not to be outdone, I decided that the data should only be saved while the timers are active. Going back to the class-dump results, I noticed a controller which exposed a toggleTimer: method. I extended my extension to see if it did as the name implied.
By extending the NSObject of which the aforementioned controller was inherited from, I was able to swizzle the existing toggleTimer method with my own.
    @implementation NSObject (TRPeriodicSave)

    - (void)TRPeriodicSave_toggleTimer:(id)arg1
    {
        NSLog(@"Timer was toggled");
        [self TRPeriodicSave_toggleTimer:arg1];
    }

    @end
I quickly launched the application and pull up Console. I was pleased to find that the toggle was called on each start and stop of the timers. The final step was tying up the lose ends and putting it all together. You can find the project in its entirety on its GitHub project page.
Concept autonomous harvesters


Where I am?
When out in the field, it is useful to know where you are relative to where you have been. The iPad presents a unique platform for presenting such information. Below is a very early prototype I have been working on. Graphics are rendered using OpenGL ES 2.0.

As it is presently the middle of winter, I await the spring to gather further data on usage to refine and extend the interface further.
Message queue? We don't need no stinking message queue
ZeroMQ touts itself as being "The Intelligent Transport Layer". Using a low-level API that closely resembles BSD sockets, not only is it intelligent, it is easy to use too.
ZeroMQ provides bindings for an astonishing number of languages, but the Ruby bindings are of particular interest to me for a professional project I am involved with. Getting up and running with a simple echo message passing interface is a snap.
require 'zmq'

context = ZMQ::Context.new
socket  = context.socket(ZMQ::REP)
socket.bind('tcp://127.0.0.1:5000')

while true
  data = socket.recv
  socket.send(data)
end
As one instance listens, another instance needs to start pump the listener with data.
require 'zmq'

context = ZMQ::Context.new
socket  = context.socket(ZMQ::REQ)
socket.connect('tcp://127.0.0.1:5000')

while true
  socket.send('Hello World!')
  puts socket.recv
end
This is, of course, the most basic example of getting up and running. ZeroMQ provides a host of routing and connection options, such as publish/subscribe interfaces, to meet all kinds of needs. For those who have the need to pass messages between applications, or even within the same application, it is a technology worth taking a closer look at.